
Getting your code and documentation into PETSc
PETSc uses git, GitLab, and its testing system, for its source code management. All new code in PETSc is accepted via merge requests (MRs).
Integration branches
release
The release branch contains the latest PETSc release including bug-fixes.
Bug-fix branches for the release should start from release.
$ git checkout release
$ git pull
$ git checkout -b yourname/fix-component-name release
Bug-fix updates, about every month or so, (e.g. 3.14.1) are tagged on release (e.g. v3.14.1).
master
The master branch (soon to be renamed) contains all features and bug-fixes that are believed to be
stable and will be in the next release (e.g. version 3.15). Users developing software based
on recently-added features in PETSc should follow master.
New feature branches and bug-fixes for master should start from master.
$ git checkout master
$ git pull
$ git checkout -b yourname/fix-component-name master
Contributing
By submitting code, the contributor gives irretrievable consent to the redistribution and/or modification of the contributed source code as described in the PETSc open source license.
Before filing an MR
Read the PETSc Style and Usage Guide
If your contribution can be logically decomposed into 2 or more separate contributions, submit them in sequence with different branches and merge requests instead of all at once.
Include tests which cover any changes to the source code.
Run the full test suite on your machine - i.e
make alltests TIMEOUT=600Run source checker on your machine - i.e
make checkbadSource
Submitting an MR
git push prints a URL that directly starts a merge request

Alternatively, use GitLab’s web interface.

Select the appropriate target branch master or release (bug-fixes only).

Select appropriate labels including Workflow::Pipeline-Testing. All merge requests and issue submissions should supply appropriate labels.

Labels are used to track related groups of activities. To receive notifications for a label (called following a label)
go to the labels page
and click Subscribe on the right side of the table for each label you wish to follow.

The labels include GPU, Fortran, DMNetwork, bug, feature, enhancement, ECP, CI, Error-handling, Tao, build, community, debugability, and maintainability.
When you subscribe to GitLab notifications it can send a great deal of email. Mail filters can use the information inside the mail to reduce and organize the notifications.
If the merge request resolves an outstanding issue, you should include a closing
pattern
such as Fixes #123 in the MR’s description so that issue gets
closed once the MR is merged.
Docs-only MR
For changes only to documentation you may
create your merge request, add the
docs-only label and you do not need to submit the MR to a pipeline.
Only small crucial documentation changes should be made to the the release branch if they apply to the release version of PETSc. All others should be applied to the master branch.
Feedback MR
Select the label Workflow::Request-For-Comment and make sure to select DRAFT at the top of the MR page
There is also a button
Add a task list(next to numbered list) if you edit any Markdown-supporting text area. You can use this to add task lists to a DRAFT MR.You do not need to test the code in this state
Fork MR
Create the MR as above from the forked repository
Select the correct target repository
petsc/petsc(along with the target branch)Assign the MR to one of the developers.
Fork users cannot run the pipeline or set labels. Hence one of the developers has to help with these processes. (If necessary - ping a developer in the comments section of the MR page)
Testing
The PETSc continuous integration pipeline runs the entire test suite on around 60 configurations of compilers, options, and machines, it takes about 3 hours.
Pipelines can be started/controlled from the Pipelines tab
on MR page. When a merge request is created a pipeline is create, you must manually un-pause it for the pipeline to run.
The pipeline status is displayed near the top of the MR page (and in the pipelines tab)
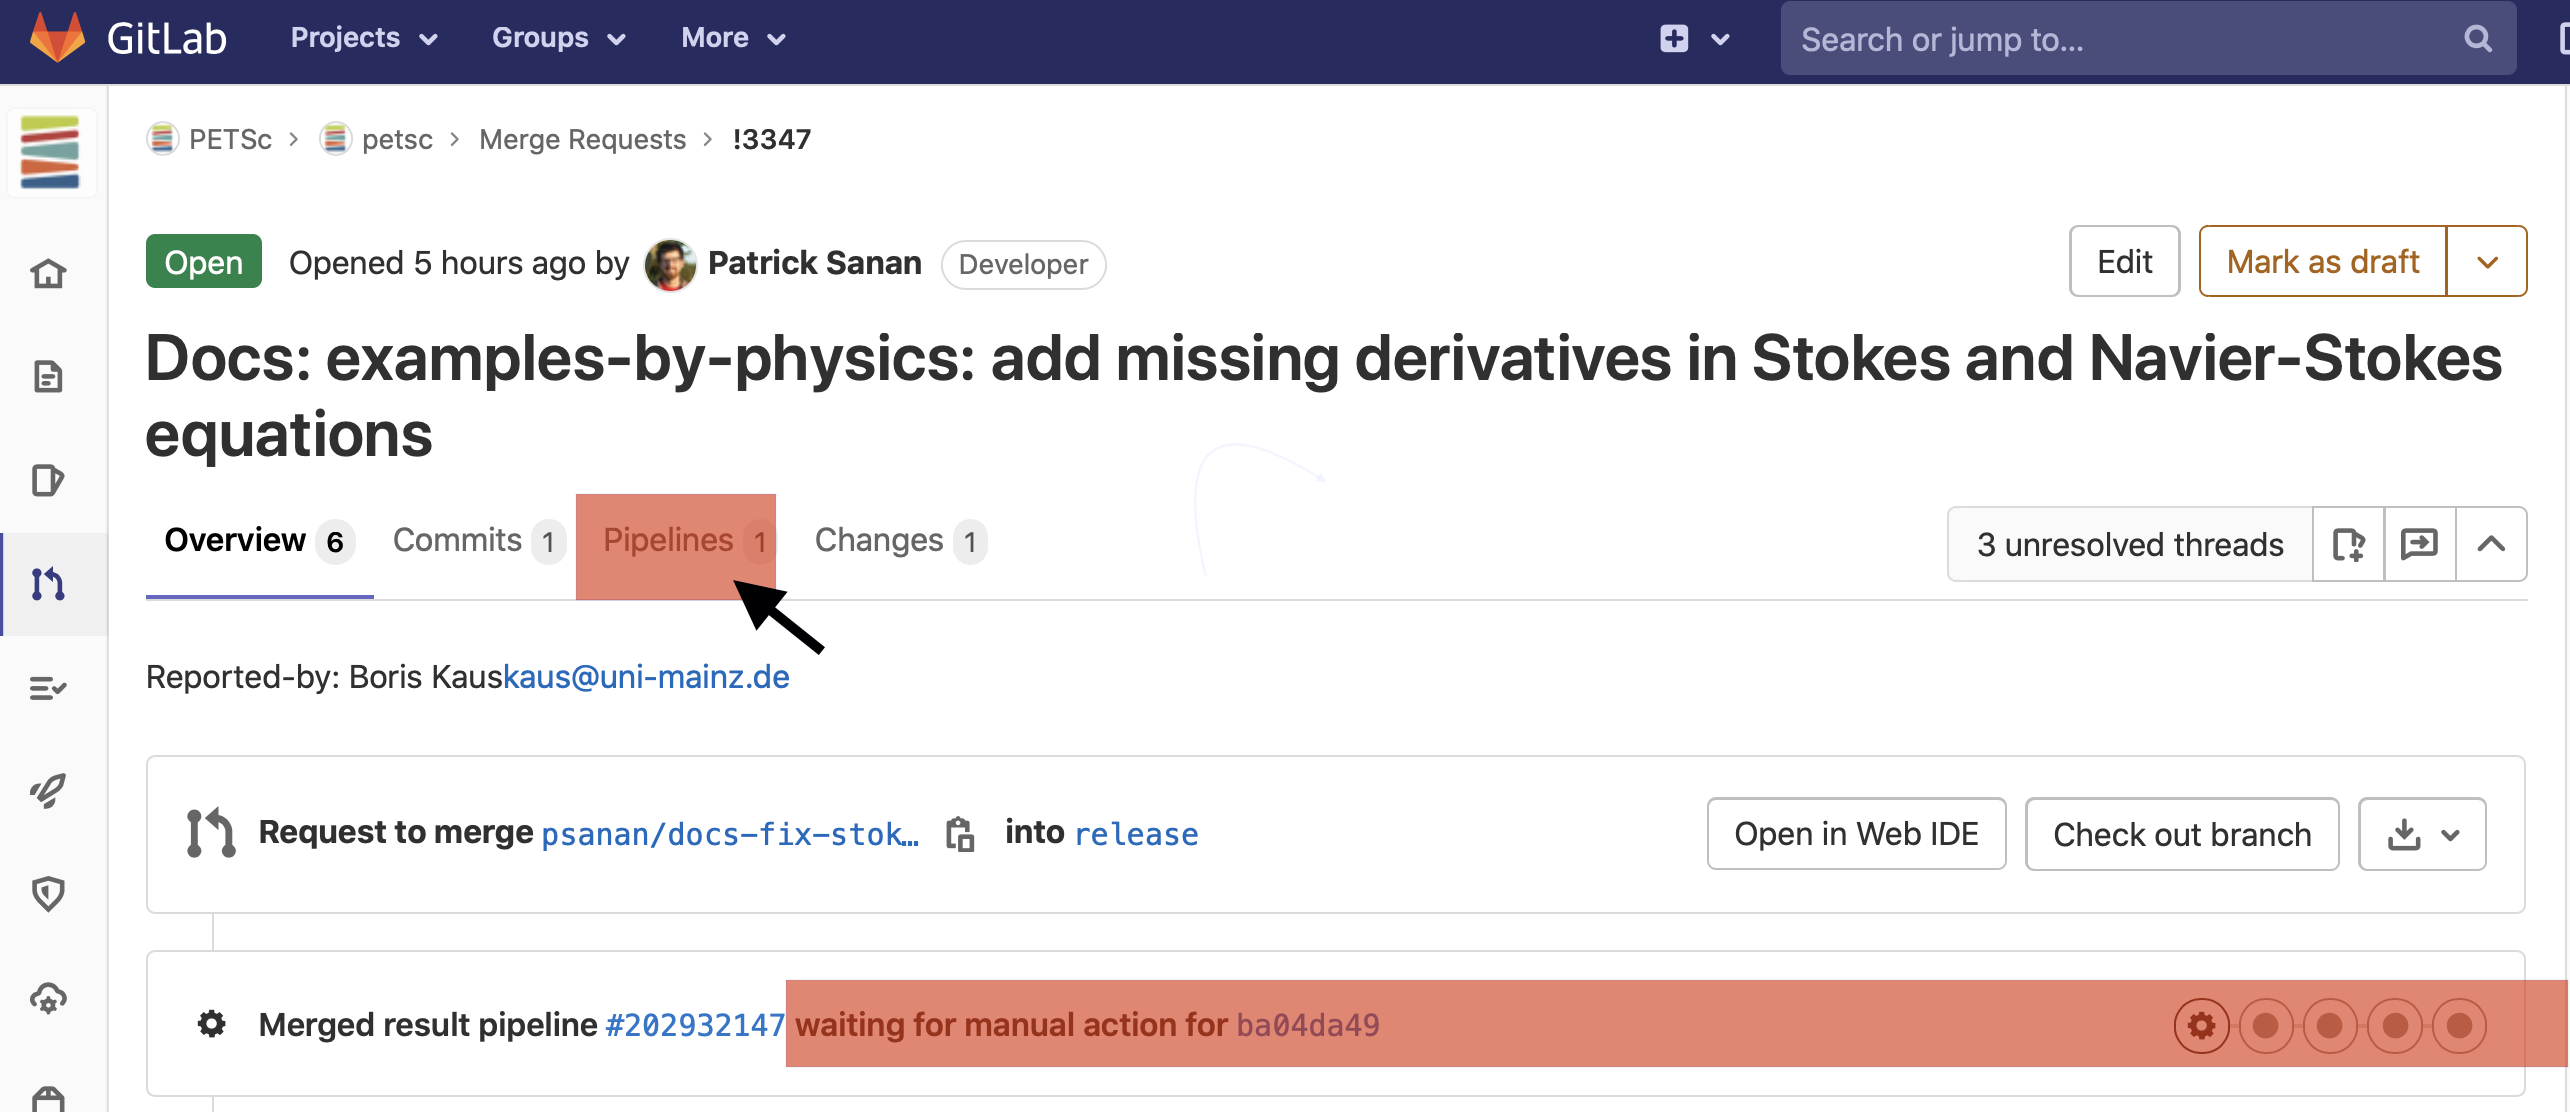

To continue the un-paused this pipeline (or
start a new one with Run Pipeline if necessary).

After you continue the pipeline it will display something like

A pipeline consists of Stages each with multiple Jobs, each of these is one configuration on one machine.

You can see the failed jobs by clicking on the X.

A job consists of many “examples”. Each test is a run of an example with a particular set of command line options
A failure in running the job’s tests will have FAILED and a list of the failed tests

Search for not ok in the jobs output to find the exact failure

This test failed because the example did not free all its objects
The pipelines organization
Pre-stage |
Stage 1 |
Stage 2 |
Stage 3 |
Post-stage |
|---|---|---|---|---|
Basic checks |
Job 1
Job 2 |
Job 1 Job 2 Job 3 |
Job 1 Job 2 Job 3 |
Accumulation of results |
MR reviewing
Once the MR has passed the pipeline, it has been approved, all threads have been resolved, and the excess commits squashed, it is ready for review. Change the label on the MR page to Workflow::Review.
It is the submitter’s responsibility to track the progress of the MR and ensure it gets merged to master (or release). If the pipeline detect problems it is the submitter’s responsibility to fix the errors.
Overview shows all the comments on the MR

There are two ways (either is fine) to comment directly on the submitted source code. Use either the Commits or Changes at the top of the MR.

Click on the left of the code to make a comment on that line of code.

Write the review text and then press Start a Review

You can also provide an exact replacement for the line you would like changed

Gitlab MRs use threads to track discussions on MR.
This allows Gitlab and reviewers to track what threads are not yet
resolved.

When responding to a thread make sure to use Reply box for that
thread; do not introduce a new thread or a comment.

The submitter must mark threads as resolved as they fix the related problem.
When introducing a new topic (thread) in reviewing a MR make sure you
submit with Start Review and not the Comment green button.
You can determine who must approve your MR by clicking on the Viewer eligible reviewers towards the top of the Overview page.


If the submitter feels the MR is not getting reviewed in a timely
manner they may Assign (upper right corner of the screen) to potential
reviewers and request in the discussion these same people to review by @
mentioning them.

When the merge has been approved, the pipeline passes, the commits have been squashed, and all the threads have been resolved, the submitter must set the label to Workflow::Ready-For-Merge.
Workflow labels
The MR process, including testing and reviewing, is managed by the Workflow labels that indicate the state of the MR. The standard workflow has three steps.
Workflow::Pipeline-TestingThe user is testing their branch. Generally, unless asked, no one else has a reason to look at such an MR.Workflow::ReviewThe user would like their branch reviewed.Workflow::Ready-For-MergeThe MR has passed all tests, passed the review, has no outstanding threads, and has been squashed.
The submitter of the MR is responsible for changing the workflow label appropriately during the MR process.
Some MRs may begin with either of the following Workflow states.
Workflow::Request-For-CommentThe branch is not being requested to be merged but the user would like feedback on the branchWorkflow::In-DevelopmentThe developer is working on the branch. Other developers not involved in the branch have generally no reason to look at these MRs.
Both of these should also be marked as Draft on the MR page.
These two states are usually eventually converted by the developer to Workflow::Review
You can run the pipelines on an MR in any workflow state.
Examples of pipeline failures
If your source code is not properly formatted you will see an error from make checkbadSource. You should always run make checkbadSource` before submitting a pipeline.

Error in compiling the source code.

Error in running configure.

You can download the configure.log file to find the problem by using the Browse button and following the paths to the configure file.


When there are failures in some jobs and a fix has been pushed, one can save time by testing only the previously
failed jobs, before running the full pipeline. To do this, un-pause a
new pipeline (do not retry the previous pipeline from before your most recent push), cancel
the pipeline on the pipeline page,

then retry the failed jobs by using the Retry
circular button to the right of job name.

It will then look like this

If the selected jobs are
successful, run the rest of the pipeline by using the Retry
button at the top of the pipeline

The retry button at the top of of a previous pipeline or job does NOT use any
new changes to the branch you have pushed since that pipeline was started - it retries exactly the
same git commit that was previously tried. The job retry should only be used in this way
when you suspect the testing system has some intermittent error that is unrelated to your branch.
Please report all “odd” errors in the testing that don’t seem related to your branch in issue 360.
Check the issue’s threads to see if the error is listed and add it there, with a link to your MR (e.g.
!1234). Otherwise, create a new thread.Click the three dots in the top right of the thread and select
Copy linkAdd this link in your MR description.
Do not overdo requesting testing; it is a limited resource, so if you realize a currently running pipeline is no longer needed, cancel it.
Git instructions
Git Environment
Set your name:
git config --global user.name "Your Name"Set your email:
git config --global user.email "me@example.com"Set
git config --global push.default simple
Git prompt
To stay oriented when working with branches, we encourage configuring git-prompt. In the following, we will include the directory, branch name, and PETSC_ARCH in our prompt, e.g.
~/Src/petsc (master=) arch-complex
$ git checkout release
 ~/Src/petsc (release<) arch-complex
The < indicates that our copy of release is behind the repository we are
pulling from. To achieve this we have the following in our .profile (for
bash)
source ~/bin/git-prompt.sh  (point this to the location of your git-prompt.sh)
export GIT_PS1_SHOWDIRTYSTATE=1
export GIT_PS1_SHOWUPSTREAM="auto"
export PS1='\w\[\e[1m\]\[\e[35m\]$(__git_ps1 " (%s)")\[\e[0m\] ${PETSC_ARCH}\n\$ '
Git tab completion
To get tab-completion for git commands, first download and then source git-completion.bash.
Starting a new feature branch
Obtain the PETSc source
If you have write access to the PETSc GitLab repository
git clone git@gitlab.com/petsc/petsc(or just use a clone you already have)
Otherwise
Create a fork (A fork is merely your own, complete private copy of the PETSc repository on
GitLab)You will be asked to
Select a namespace to fork the project, click the greenSelectbuttonIf you already have a clone on your machine of the PETSc repository you would like to reuse
git remote set-url origin git@gitlab.com:YOURGITLABUSERNAME/petsc.git
Otherwise
git clone git@gitlab.com:YOURGITLABUSERNAME/petsc.git
Make sure you start from master for a new feature branch:
git checkout master; git pullCreate and switch to a new feature branch:
git checkout -b <loginname>/<affected-package>-<short-description>
For example, Barry’s new feature branch on removing CPP in snes/ will use
git checkout -b barry/snes-removecpp. Use all lowercase and no additional underscores.Write code and tests
Inspect changes:
git statusCommit code:
Add new files to be committed:
git add file1 file2followed byCommit all files changed:
git commit -aorCommit selected files:
git commit file1 file2 file1
Push the feature branch for testing:
git push -u origin barry/snes-removecpp
If you have long-running development of a feature branch, you will probably
fall behind the master branch.
You can move your changes to the top
of the latest master using
$ git rebase master (while in your branch)
Quick summary of Git commands
Managing branches
Switch:
git checkout <branchname>, for examplegit checkout barry/snes-removecppShow local and remote-tracking branches:
git branch -aShow all branches available on remote:
git ls-remote. Usegit remote show originfor a complete summary.Delete local branch:
git branch -d <branchname>(be careful, you cannot get it back)Delete remote branch:
git push origin :<branchname>(mind the colon in front of the branch name) (be careful, you cannot get it back)Show available remotes:
git remote -v(you usually only have one)Checkout and track a branch available on remote:
git checkout -t knepley/dm-hexfemIf you have multiple remotes defined, use
git checkout -t <remotename>/knepley/dm-hexfem, e.g.git checkout -t origin/knepley/dm-hexfemCheckout a branch from remote, but do not track upstream changes on remote:
git checkout --no-track knepley/dm-hexfem
Reading commit logs
Show logs:
git logShow logs for file or folder:
git log [file or directory]Show changes for each log:
git log -p[file or directory]Show diff:
Current working tree:
git diff [file or directory]To other commit:
git diff <SHA1> [file or directory]Compare version of file in two commits:
git diff <SHA1> <SHA1> [file or directory]
Show changes that are in master, but not yet in my current branch:
git log ..master [file or directory]Tabulated by author:
git shortlog v3.3..master [file or directory]
Showing branches:
Not yet in
mastergit branch --all --no-merged masterIn master
git branch --all --merged masterRemove
--allto the above to not include remote tracking branches (work you have not interacted with yet).
Find where to fix a bug:
Find the bad line (e.g., using a debugger)
Find the commit that introduced it:
git blame [file]Find the branch containing that commit:
git branch --contains COMMIT(usually one feature branch)Fix bug:
git checkout feature-branch-name, fix bug,git commitDiscard changes to a file which are not yet committed:
git checkout fileDiscard all changes to the current working tree:
git checkout -f
Writing commit messages
ComponentName: one-line explanation of commit

After a blank line, write a more detailed explanation of the commit.
Many tools do not auto-wrap this part, so wrap paragraph text at a
reasonable length. Commit messages are meant for other people to read,
possibly months or years later, so describe the rationale for the change
in a manner that will make sense later.

If any interfaces have changed, the commit should fix occurrences in
PETSc itself and the message should state its impact on users.

If this affects any known issues, include ``fix #ISSUENUMBER`` or
``see #ISSUENUM`` in the message (without quotes). GitLab will create
a link to the issue as well as a link from the issue to this commit,
notifying anyone that was watching the issue. Feel free to link to
mailing list discussions or [petsc-maint #NUMBER].
Formatted commit message tags:
We have defined several standard commit message tags you should use; this makes it easy
to search for specific types of contributions. Multiple tags may be used
in the same commit message.

\spend 1h  or 30m

* If other people contributed significantly to a commit, perhaps by
reporting bugs or by writing an initial version of the patch,
acknowledge them using tags at the end of the commit message.

Reported-by: Helpful User <helpful@example.com>
Based-on-patch-by: Original Idea <original@example.com>
Thanks-to: Incremental Improver <improver@example.com>

* If work is done for a particular well defined funding
source or project you should label the commit with one
or more of the tags

Funded-by: My funding source
Project: My project name
Commit message template:
In order to remember tags for commit messages you can create
a file ~/git/.gitmessage containing the tags. Then on each commit
git automatically includes these in the editor. Just remember to
always delete the ones you do not use. For example I have

Funded-by:
Project:
\spend
Reported-by:
Thanks-to:
Searching git on commit messages:
You can search the
commit history for all contributions for a single project etc.

* Get summary of all commits Funded by a particular source
  git log --all --grep='Funded-by: P-ECP’ --reverse [-stat or -shortstat]

* Get the number of insertions
 git log --all --grep='Funded-by: P-ECP' --reverse --shortstat | grep changed | cut -f5 -d" " | awk '{total += $NF} END { print total }'

* Get the number of deletions
 git log --all --grep='Funded-by: P-ECP' --reverse --shortstat | grep changed | cut -f7 -d" " | awk '{total += $NF} END { print total }'

* Get time
 git log --all --grep='Funded-by: P-ECP' | grep Time: | cut -f2 -d":" | sed s/hours//g | sed s/hour//g |awk '{total += $NF} END { print total }'
Squashing excessive commits
Often a branch accumulates extra commits from bug-fixes or tiny improvements for previous commits. These changes do not belong as separate commits but
should be included in an appropriate previous commit. These commits will often break git bisect.
removing these commits is called squashing and can be done several ways, the easiest is with the rebase command.
Say you have made three commits and the most recent two are fixes for the first of the three then use
git rebase -i HEAD~3
TODO: include images of the processes
If the branch has already been pushed this means the squashed branch you have now is not compatible with the remote copy of the branch. You must force push your changes with
git push -u origin +branch-name
to update the remote branch with your copy. This must be done with extreme care and only if you know someone else has not changed the remote copy of the branch,
otherwise you will lose those changes. Never do a git pull after you rebase since that will bring over the old values and insert them back into the document
making a mess of the material and its history.
You can use git log to see the recent changes to your branch and help determine what commits should be squashed.
It is better to squash your commits regularly than to wait until you have a large number of them to squash because you will then not know which commits need to be combined.